CDXZipStream,our Microsoft Excel add-in, contains an array of demographic data that can provide invaluable insight into your current and potential customers. For example, data such as household size, income, educational attainment, ethnic background, and housing value can be a critical input to your marketing program or business plan. CDXZipStream demographic versions can provide these fields and more, based on resources such as the 2010 Census, the latest 5-year American Community Survey, and the Census Survey of U.S. Businesses – please see our version comparison for more information.
Once you get the demographics you need from CDXZipStream, it may also be helpful to map the data to get a visual picture of the results. In this case we recommend using Microsoft MapPoint, which allows you to easily import data from Excel and provides a wide range of mapping options as well.
(Note: MapPoint is available as a 14-day, fully-functional free trial, available for download from the Microsoft website.)
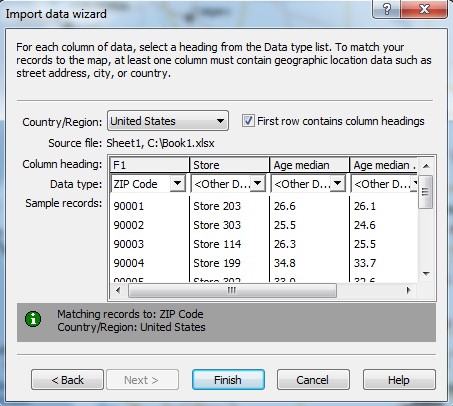
To map your data using MapPoint, click on “Data” on the main MapPoint toolbar at the top of the screen, and then select “Import data wizard …” from the drop-down list. From here you can select the Excel file that contains the demographic data of interest; you can also select other types here such as text or Access database files. After selecting the desired file, you will also be asked to select the appropriate worksheet (assuming the file was an Excel workbook). Then click “Next”, and you’ll see a MapPoint dialog like this:

From here the mapping parameters can be specified. First select the applicable country or region, as well as whether the first row contains column headings. Under each column shown in the dialog, you will also need to specify the data type for each column of data. For example, the first column in the screenshot above is the list of zip codes that forms the basis of the demographic data, and so select “ZIP Code” from the drop-down list of data types. At least one column of data like this must be available in order to geo-locate the data on the map. For the other columns of data, you can specify “Name” (to help identify the area or pushpin on the map), “Other Data” (which will provide the numeric value), or “Skip Column” (to exclude this data altogether). Note that if multiple columns of data are identified as “Other Data” all values will be used in the mapping analysis. Since data will overlap for the same location, these maps may be difficult to read; consider creating separate maps for each column of data as an alternative.
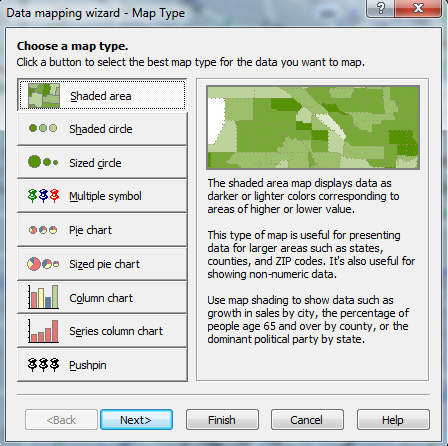
In the example above we want to map median age by zip code. The first column of zip codes is used to geo-locate the data, so we select “ZIP Code” as the data type, and we also select median age as the “Other Data” type. The column containing store number information can be used as the “Name” type so this data can be used to identify each point provided on the map. All other columns of data are specified as “Skip Column”. After clicking on “Finish”, all we need to do is specify the map type:

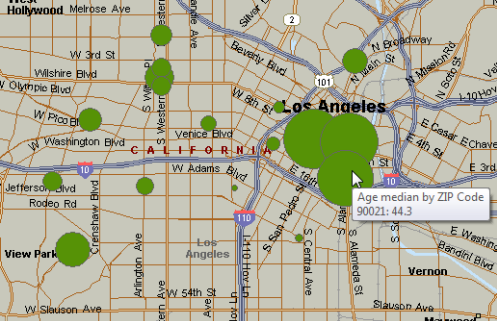
To create a map showing circles that are sized relative to the median age value, we click on “Sized Circle”, and the result is:

Passing the cursor over one of the circles will show the zip code and median age value. Double clicking on the same circle will also show the store number value.
Once the map has been created, you can also use MapPoint right-click features for each point. Use your mouse to right-click on one of the circles to show or hide data, include the point in a route, or even create a drive-time zone around the point, like this:

MapPoint can be an extremely powerful tool to help visualize your geographic data and support your business needs. Consider evaluating the free trial of MapPoint the next time your get demographic data from CDXZipStream. We also recommend MP2K as a reputable reseller of MapPoint software.